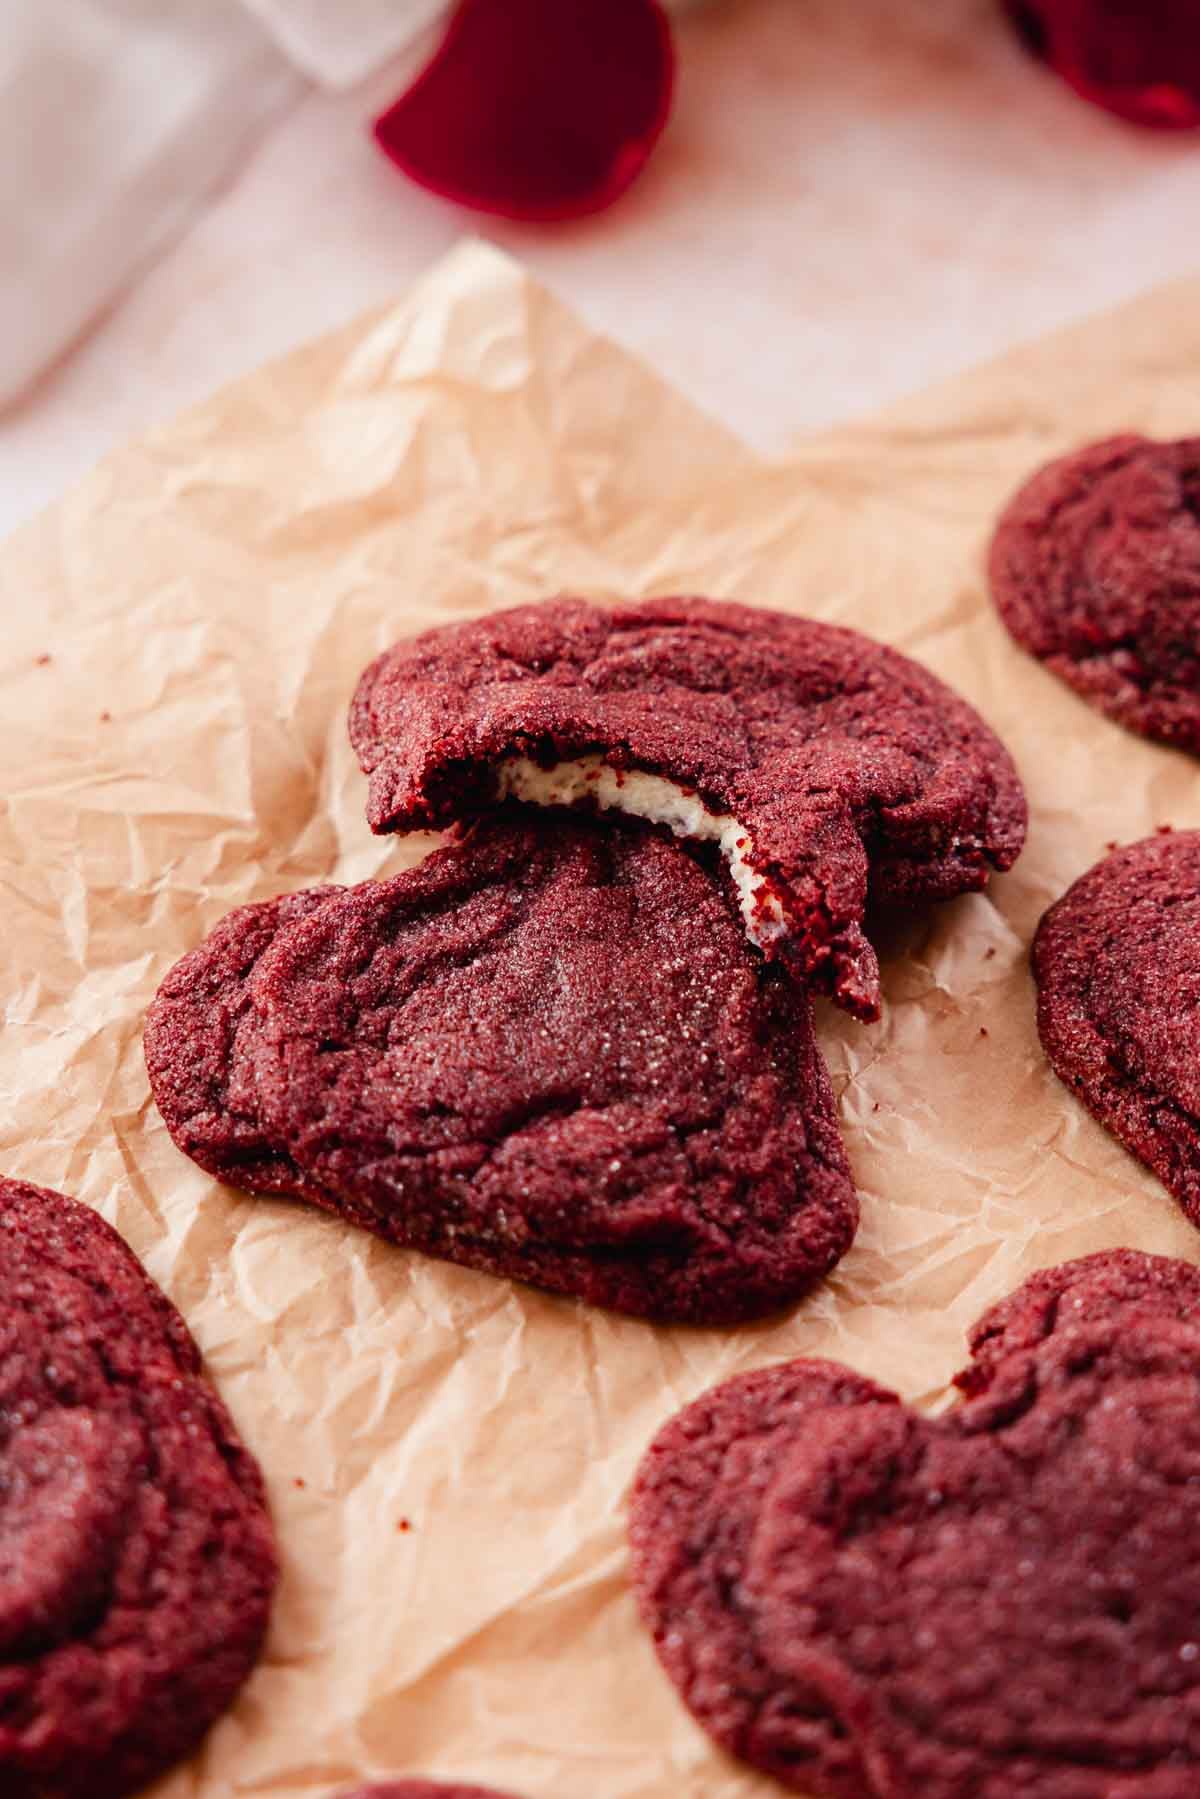
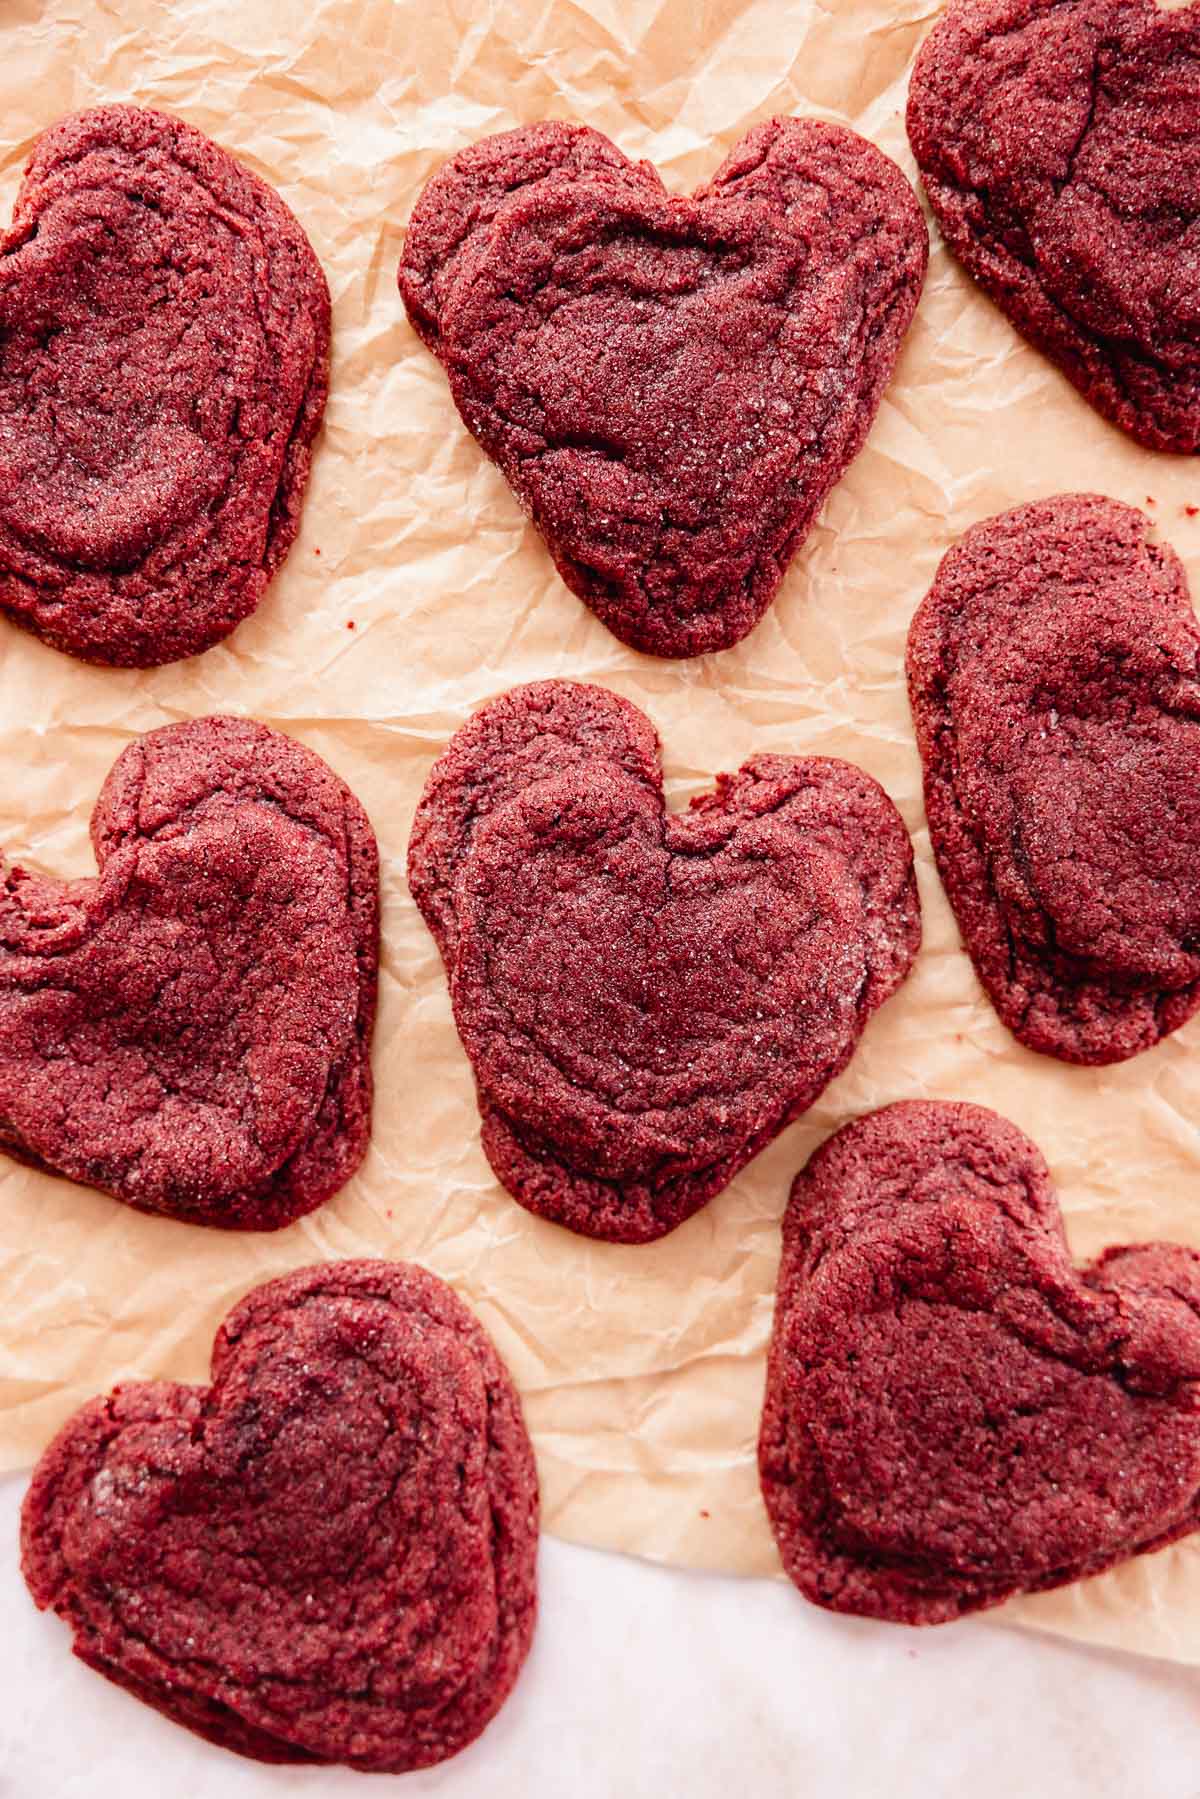
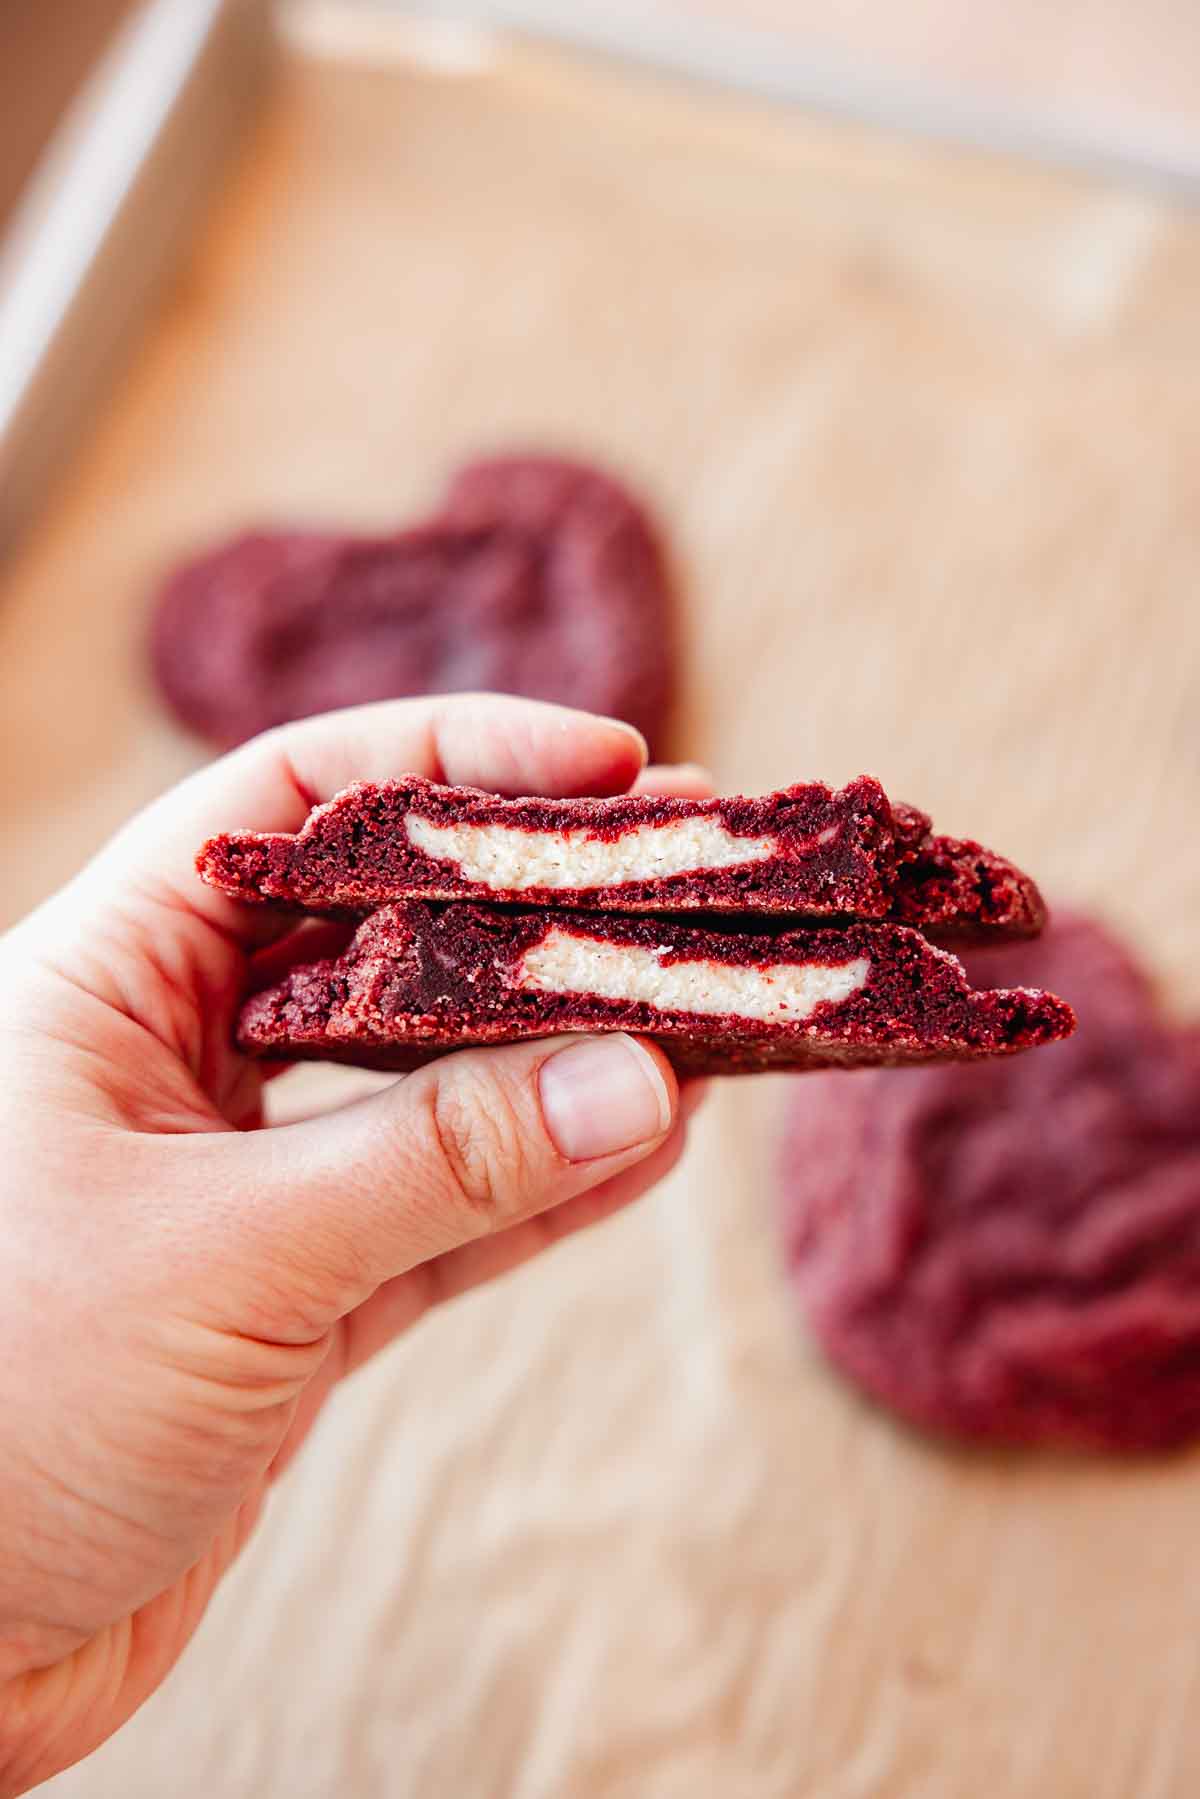
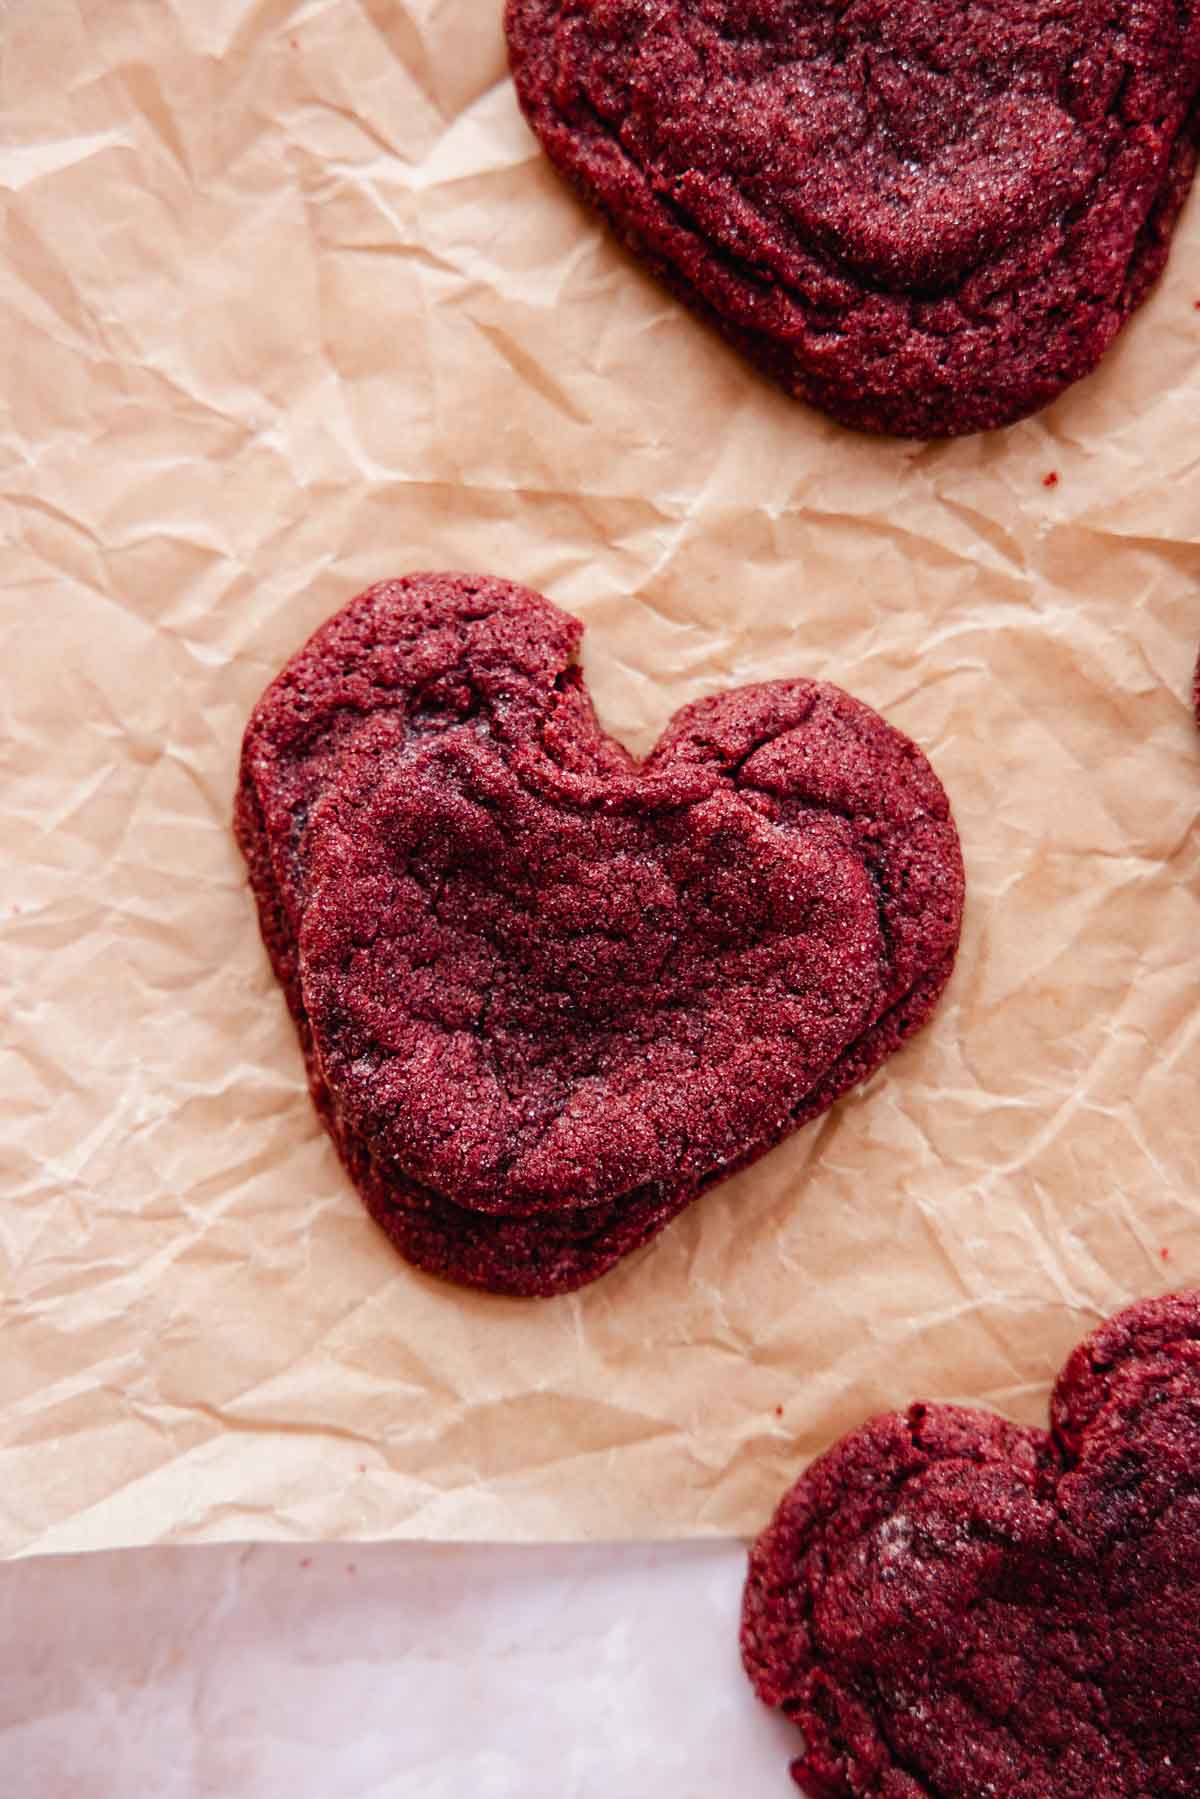
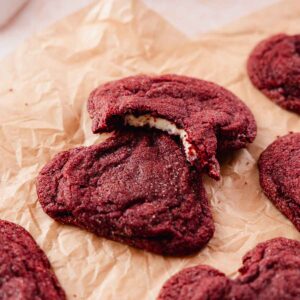
These red velvet cookies are filled with a creamy cheesecake center, have crisp edges and a soft chewy center. They're shaped into hearts using an easy, no cookie cutter method. These cookies are perfect to make for Christmas, the Holidays, and Valentine's Day. Or, for any occasion - especially if you love Red Velvet Cake! They have all of the components of red velvet cake flavor including the light cocoa flavor and cream cheese frosting (as the filling). You can also make these cookies without the filling if you prefer.
Jump to:
- 🍪 Why you'll LOVE this recipe
- 📝 Key ingredients
- 👩🍳 How to make red velvet cookies
- Cream cheese filling step by step
- Red velvet cookie dough step by step
- ✔️ Expert cookie tips
- 🥄 Make ahead and storage
- ❔ How do I bake red velvet cookies without filling?
- 📖 Recipe FAQs
- ❤️ More related red velvet recipes
- 📖 Recipe
- 💬 Comments
🍪 Why you'll LOVE this recipe
- Red velvet: All of the flavor and components of a classic red velvet cake, in a cookie!
- Cheesecake filling: A simple three ingredient cream cheese filling is easy to whip up and creates a lovely, rich and gooey center.
- Chewy cookies with crisp edges: These cookies have the perfect texture. Crisp edges, with a soft and chewy center.
📝 Key ingredients
Read through for all the tips you will need for success!
Full steps and ingredients in recipe card below.
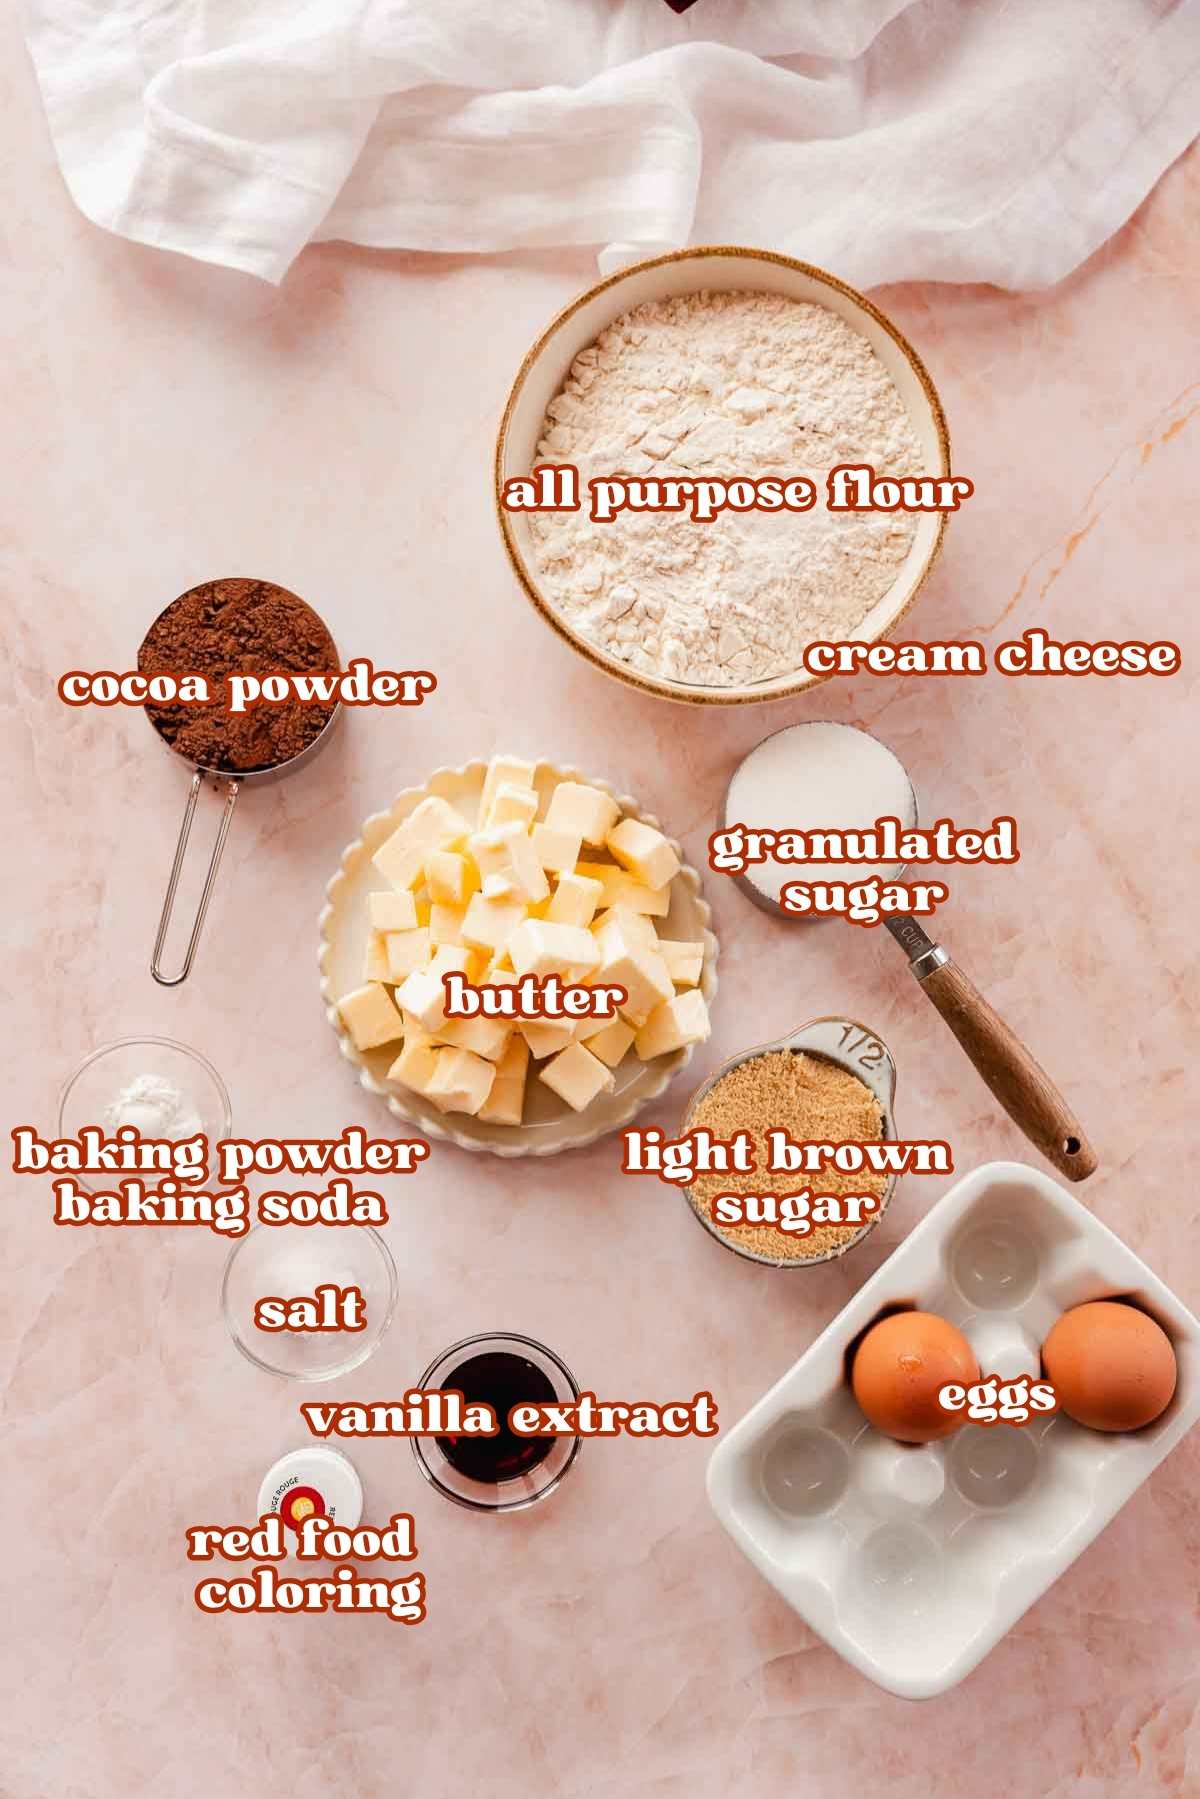
Light brown and granulated sugar: Light brown sugar adds moisture and chew, while granulated gives the cookie more crisp.
All purpose flour: Weigh the flour to get the most accurate results. If you don’t have a scale, measure properly by stirring the bag and spooning gently into a measuring cup. Scrape the excess off the top with the flat edge off a knife without packing it into the cup.
Cocoa powder: A touch of cocoa powder adds that subtle cocoa flavor that red velvet cake has. I used dutch processed cocoa powder for a more vibrant cocoa flavor. You can also use natural cocoa powder. Make sure that you use unsweetened cocoa powder.
Baking soda: Allows cookies to spread in the oven and gives them an airier, chewier texture.
Baking powder: Baking powder gives the cookie dough a bit more lift in the oven, preventing the cookies from spreading too much and becoming very flat. This doesn't create a cakey cookie. Check that it isn't expired so that it works properly in the recipe!
Butter: I use unsalted butter to be able to control the saltiness in the cookies. You could use salted butter, but keep in mind that the spread of the cookie may be different with salted butter and don't forget to omit the added salt!
Cream cheese: Full fat brick style cream cheese will work the best when stuffing cookies. This is because cream cheese has a lower moisture content and sets better than low fat or spreadable cream cheese.
Red food coloring: To get that signature red velvet color. I love using gel food coloring as it's more vibrant and you need less than you would need liquid food coloring. You can most certainly use liquid red food coloring if you prefer.
👩🍳 How to make red velvet cookies
Cream cheese filling step by step
Make this one hour before making the cookie dough so that the filling has a chance to freeze. You can make the cheesecake cookie filling 1-2 days ahead of time and freeze until you're ready to make the cookie dough and bake the cookies. I used this method in my chai cookies as well.
Step 1: In a medium bowl, combine cream cheese, sugar, and vanilla extract/paste. Mix together until creamy.
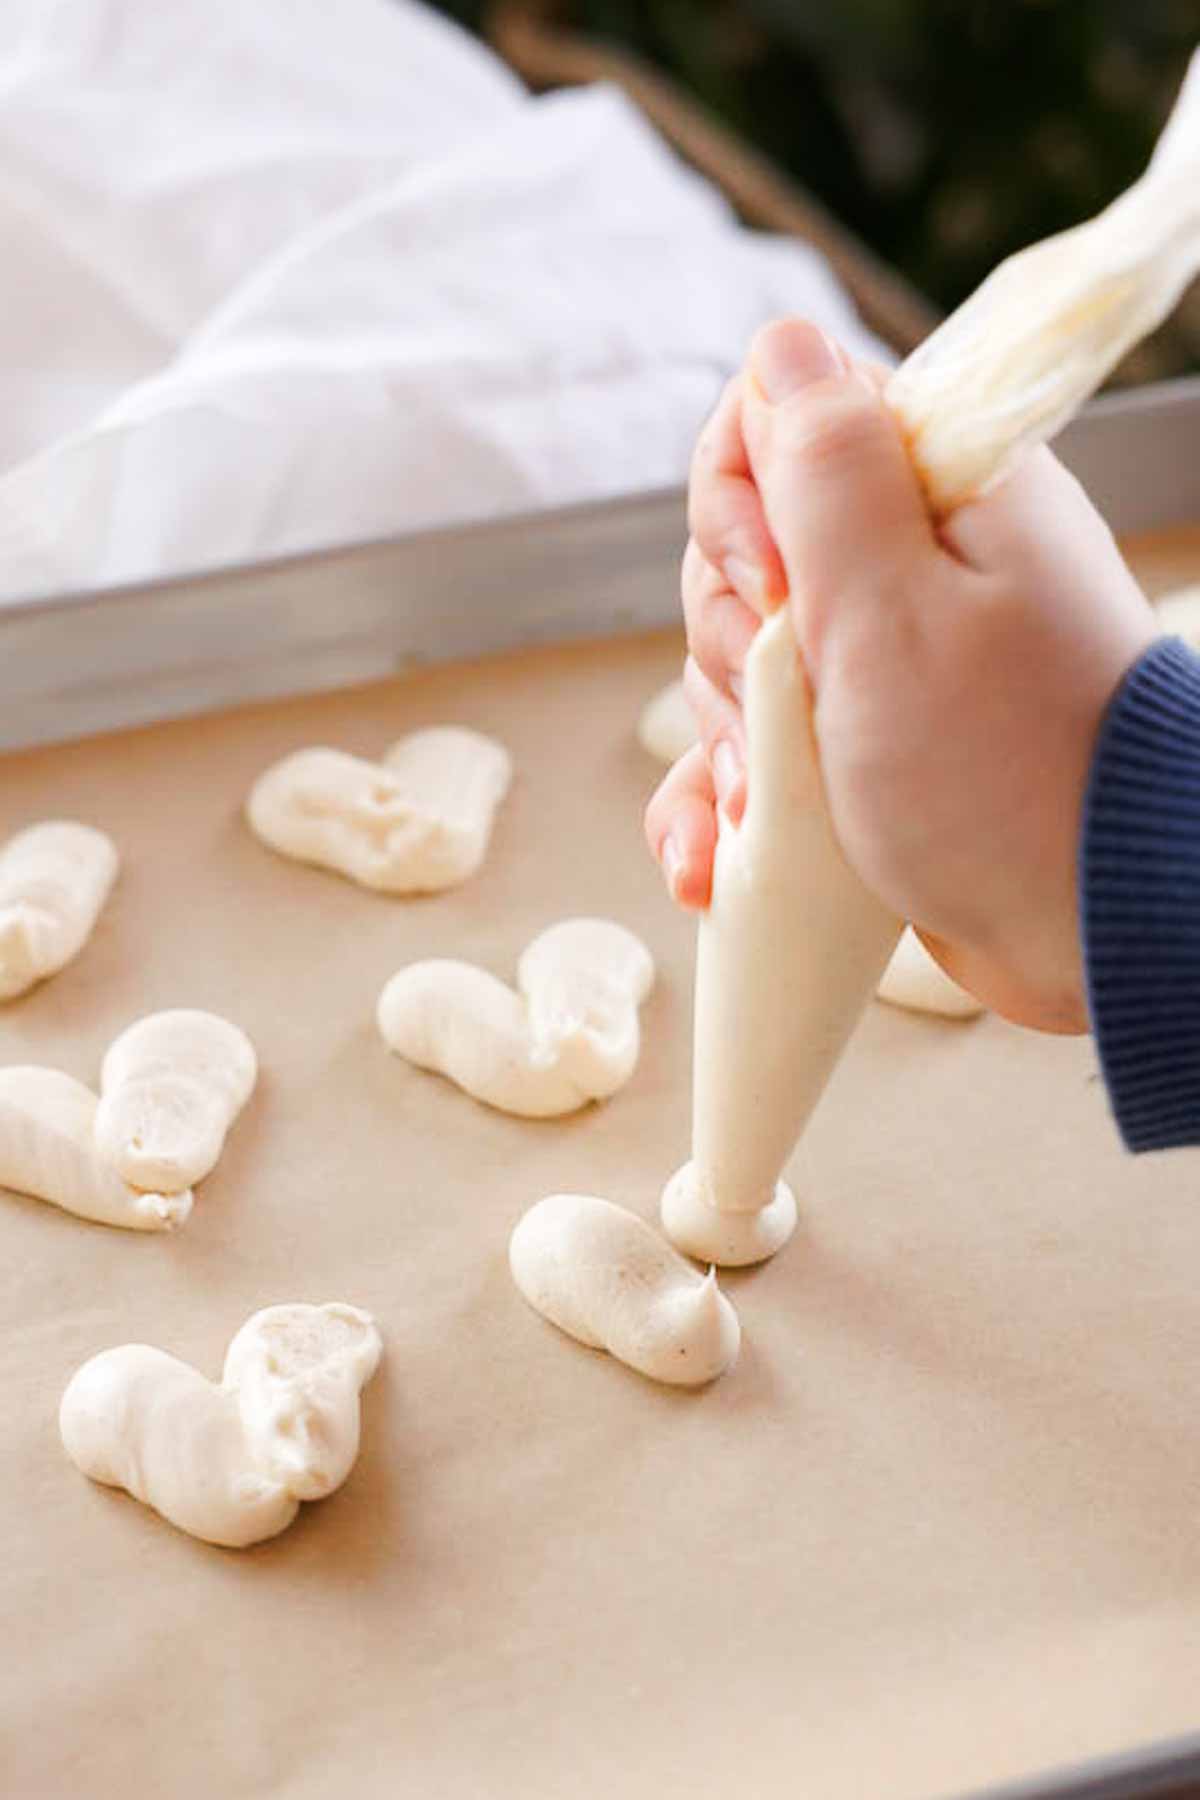
Step 2: Transfer to a piping bag or a ziploc bag with the end cut off. Pipe 16 heart shaped dollops onto a parchment lined baking sheet or plate. Place the baking sheet into the freezer to freeze.
Red velvet cookie dough step by step
Prep: Preheat the oven to 355°F (180°C). Line a cookie sheet with parchment paper.

Step 1: In a stand mixer or large bowl, combine softened butter, granulated sugar, and light brown sugar. Mix with an electric mixer until it starts to get light and creamy.
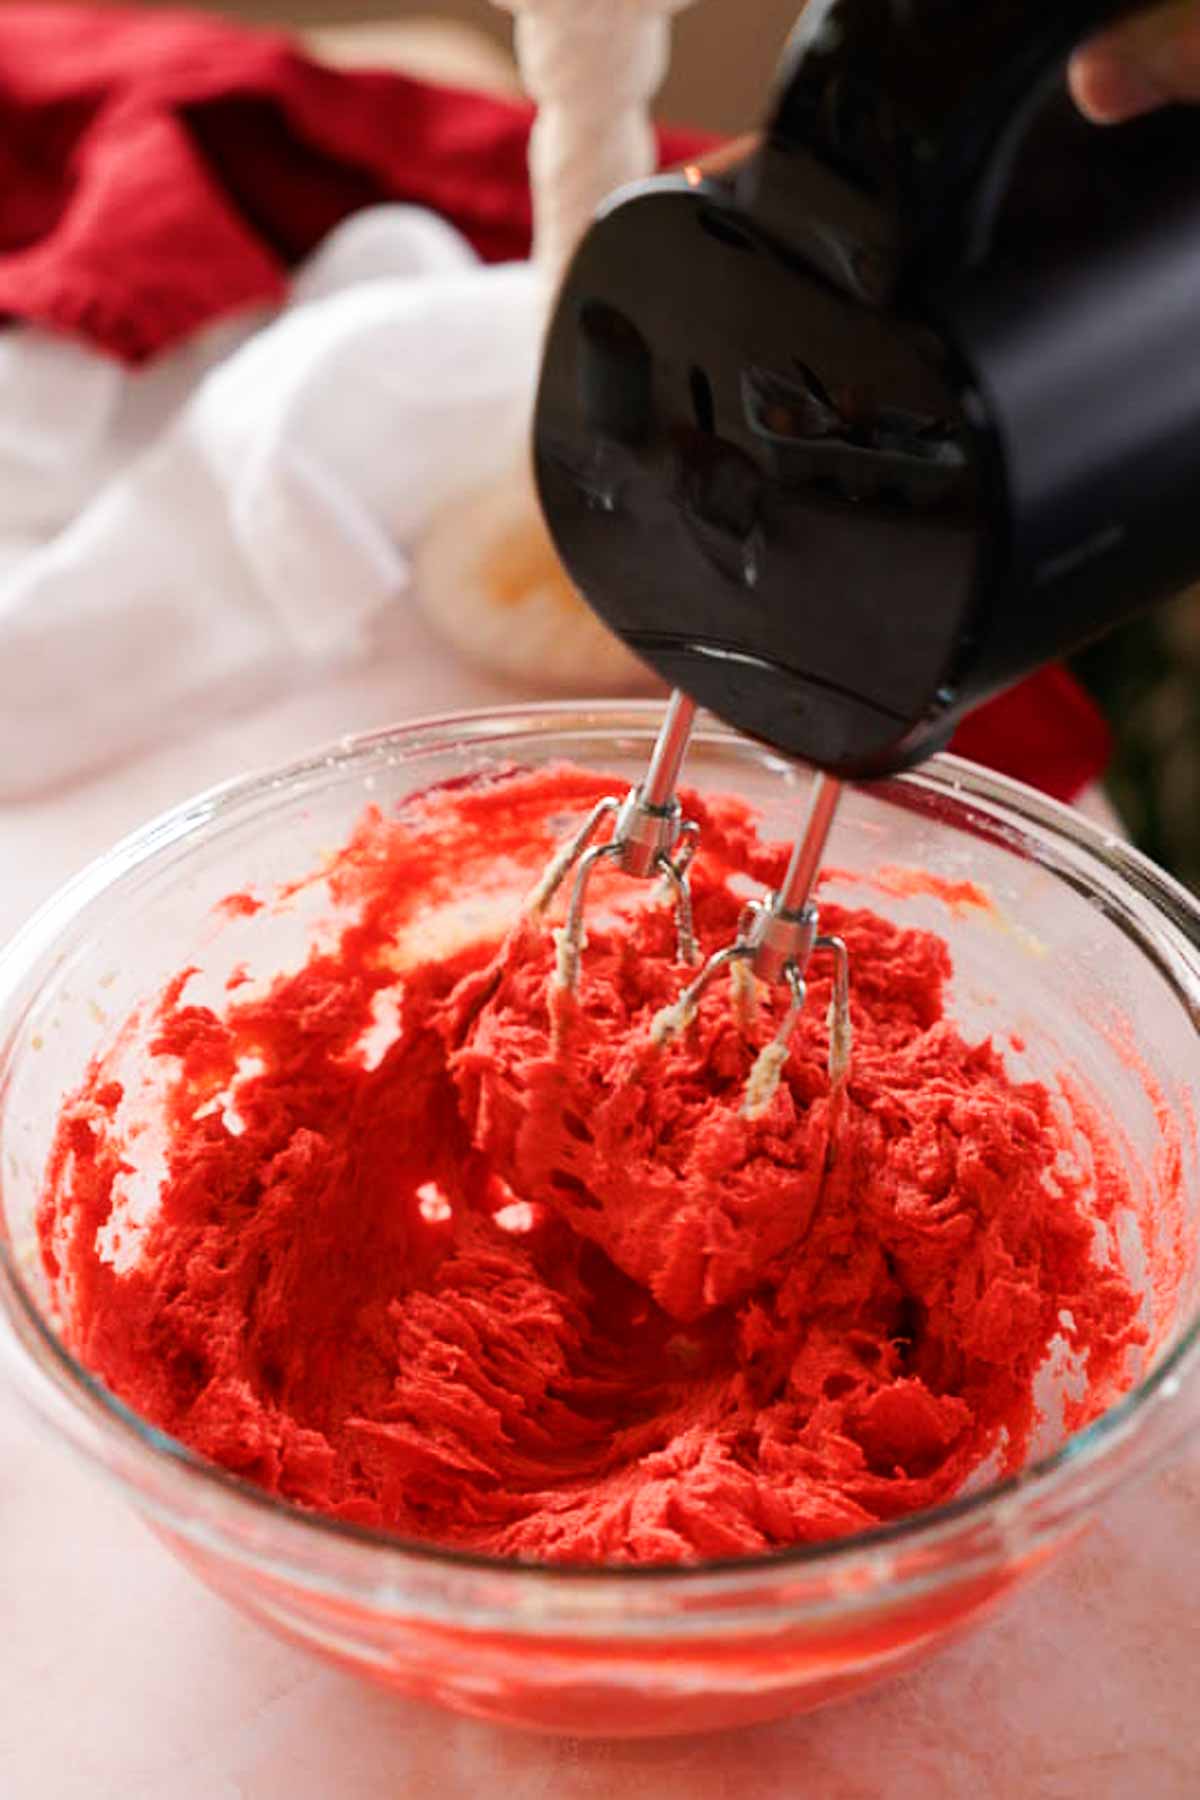
Step 2: Add one egg, egg yolk, vanilla extract, salt, and a generous dollop of red food coloring to the butter mixture. Mix until combined.
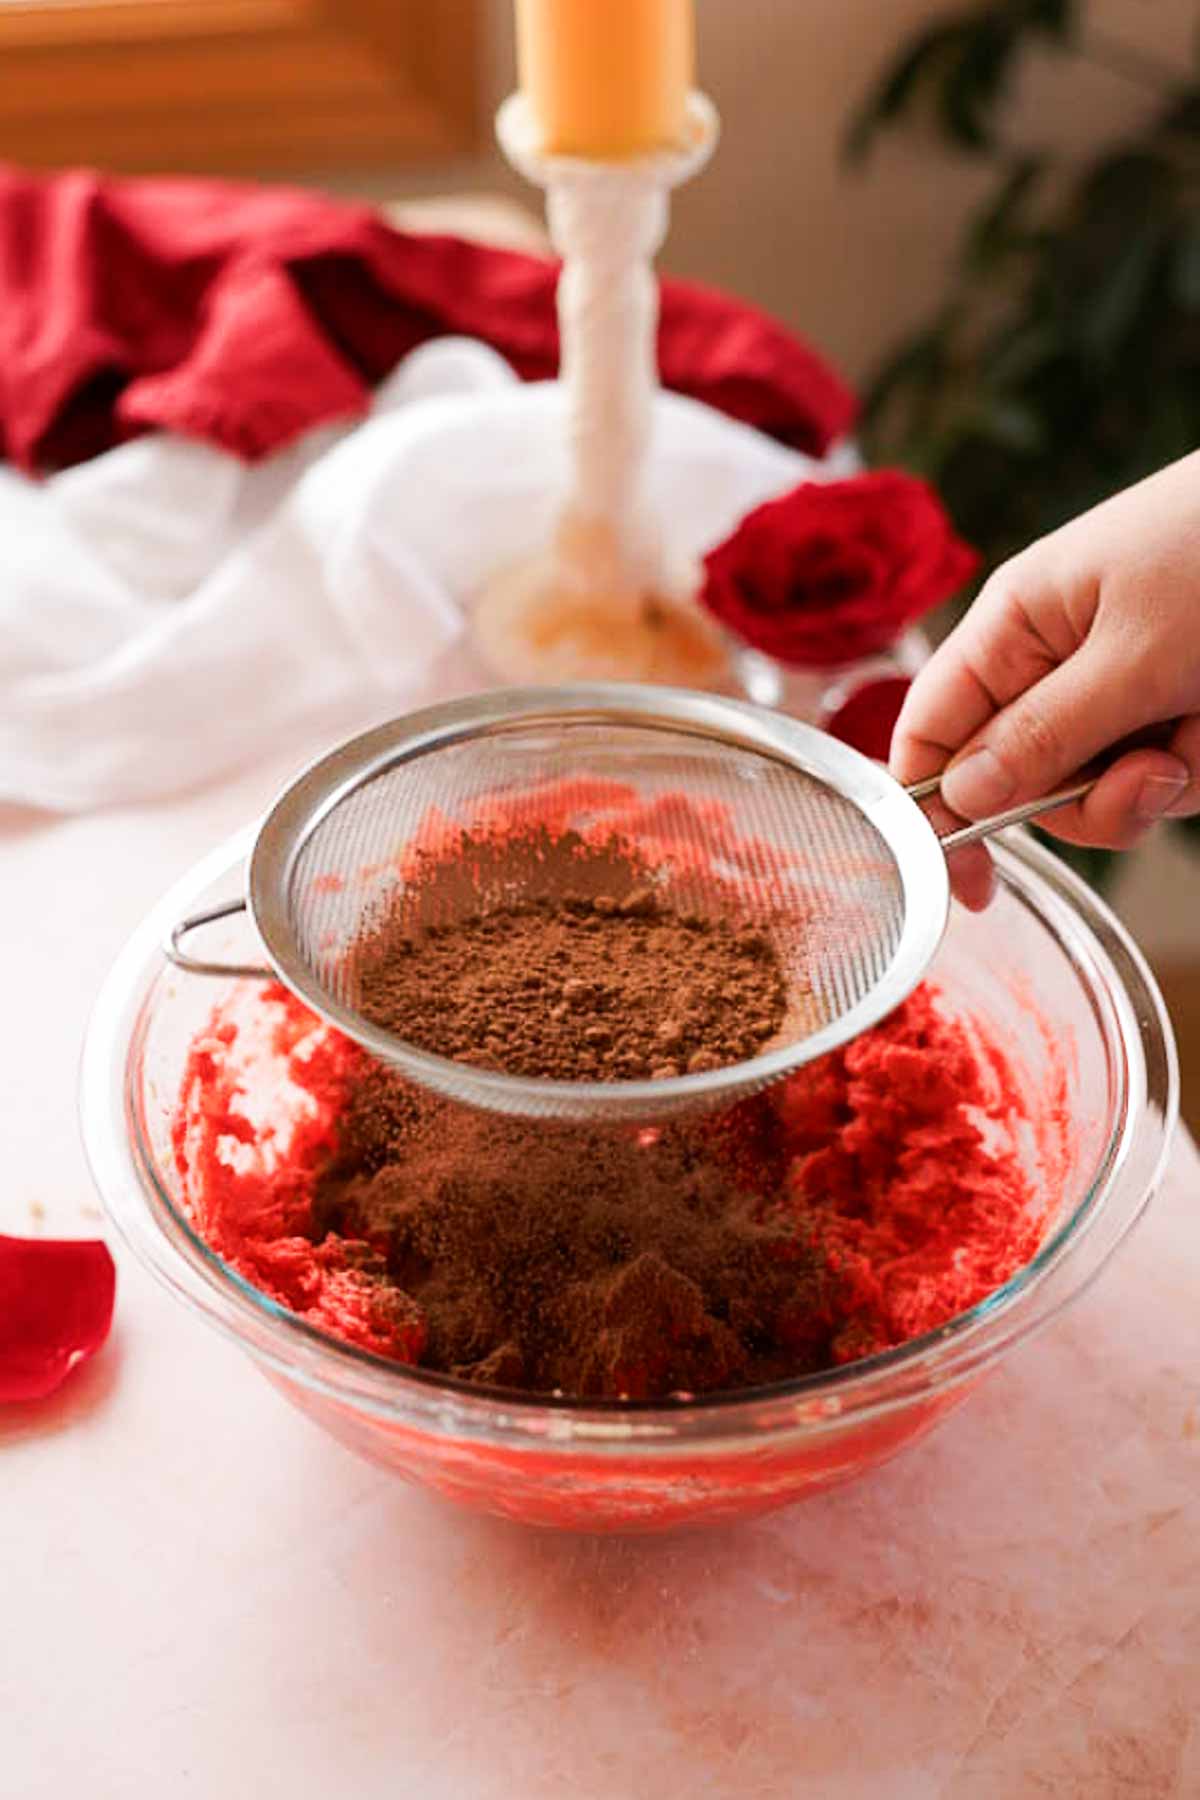
Step 3: Sift the cocoa powder into the mixture. Add flour, baking soda, and baking powder into the bowl. Stir together to form a cookie dough.
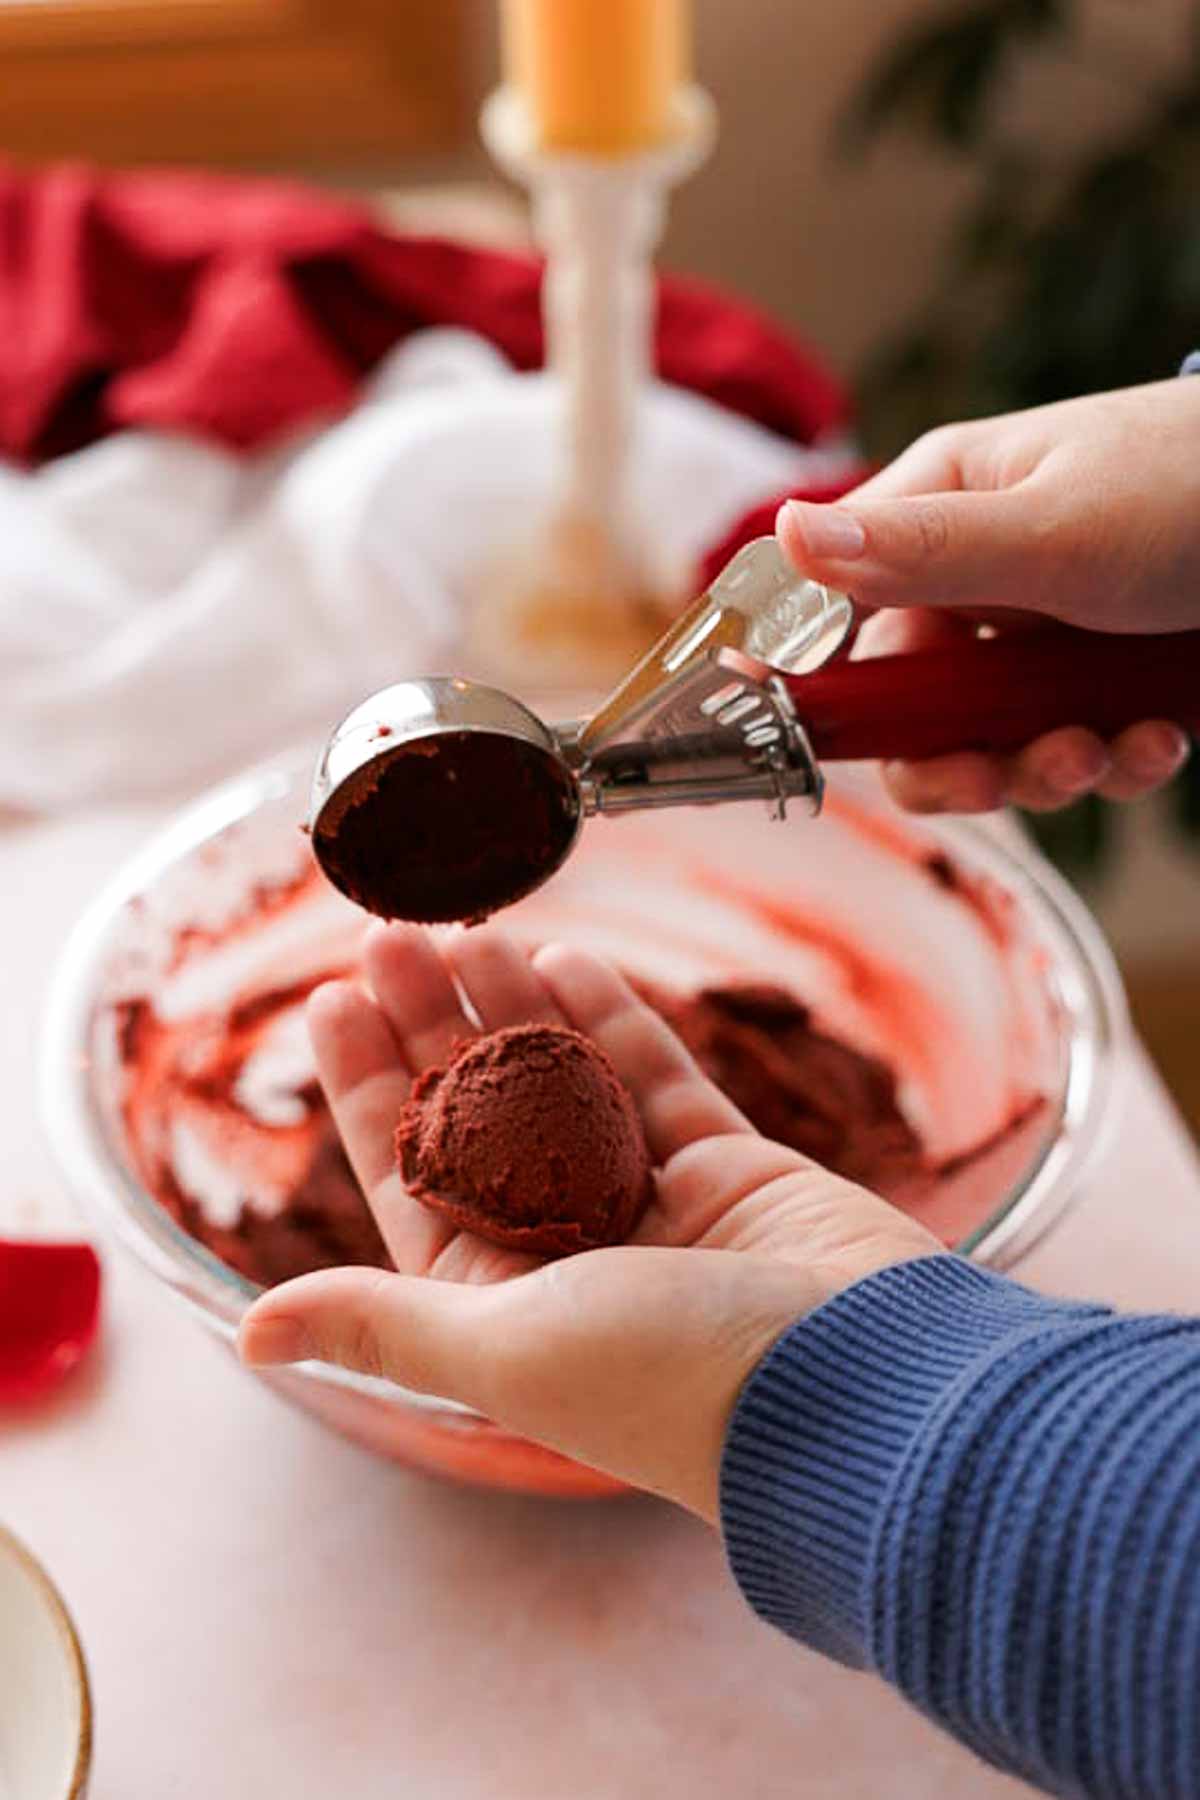
Step 4: Portion the cookie dough into 16 balls. I used a 1.35 oz (2.7 tablespoon scoop) for this.
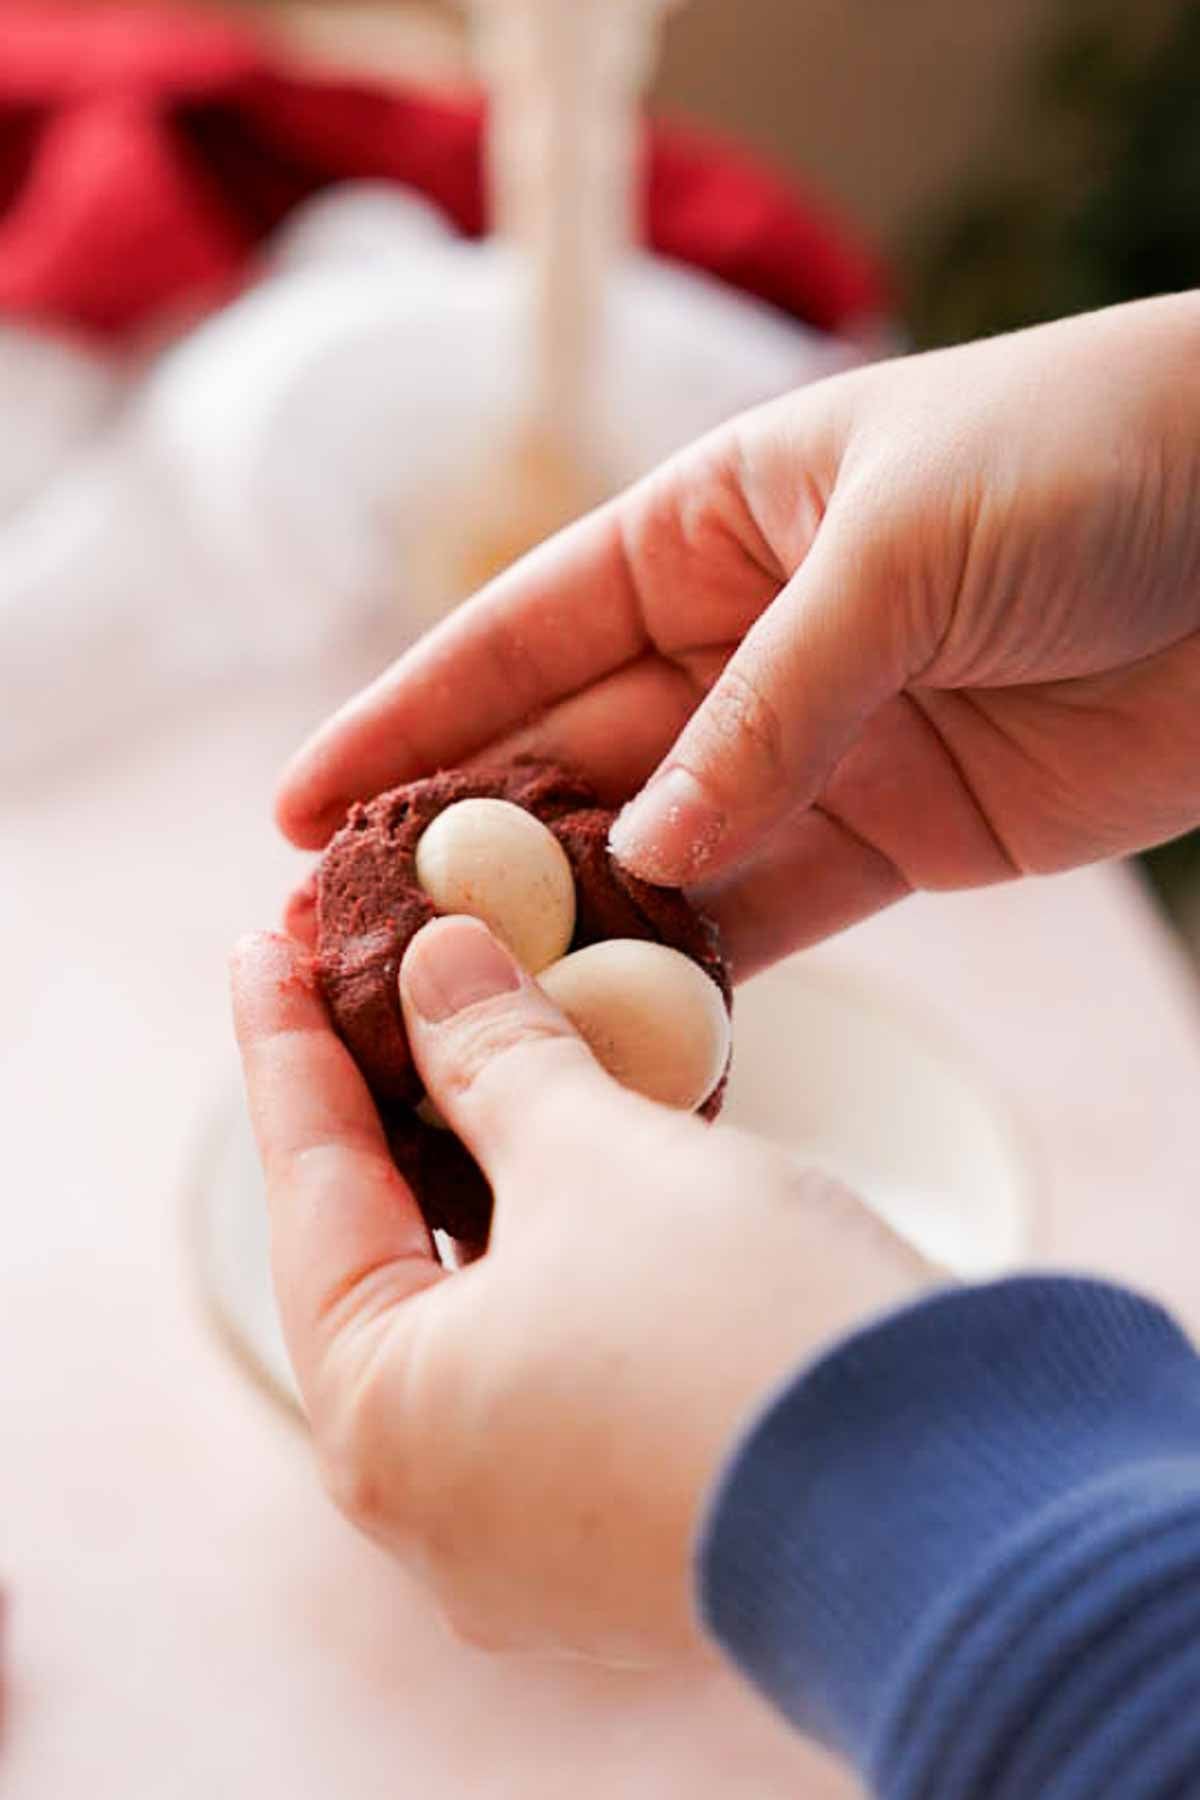
Step 5: Remove the cream cheese from the freezer. One by one, flatten each cookie dough ball and add the cream cheese filling into the center. Press the cookie dough around the filling. Work quickly so that the filling doesn't melt.
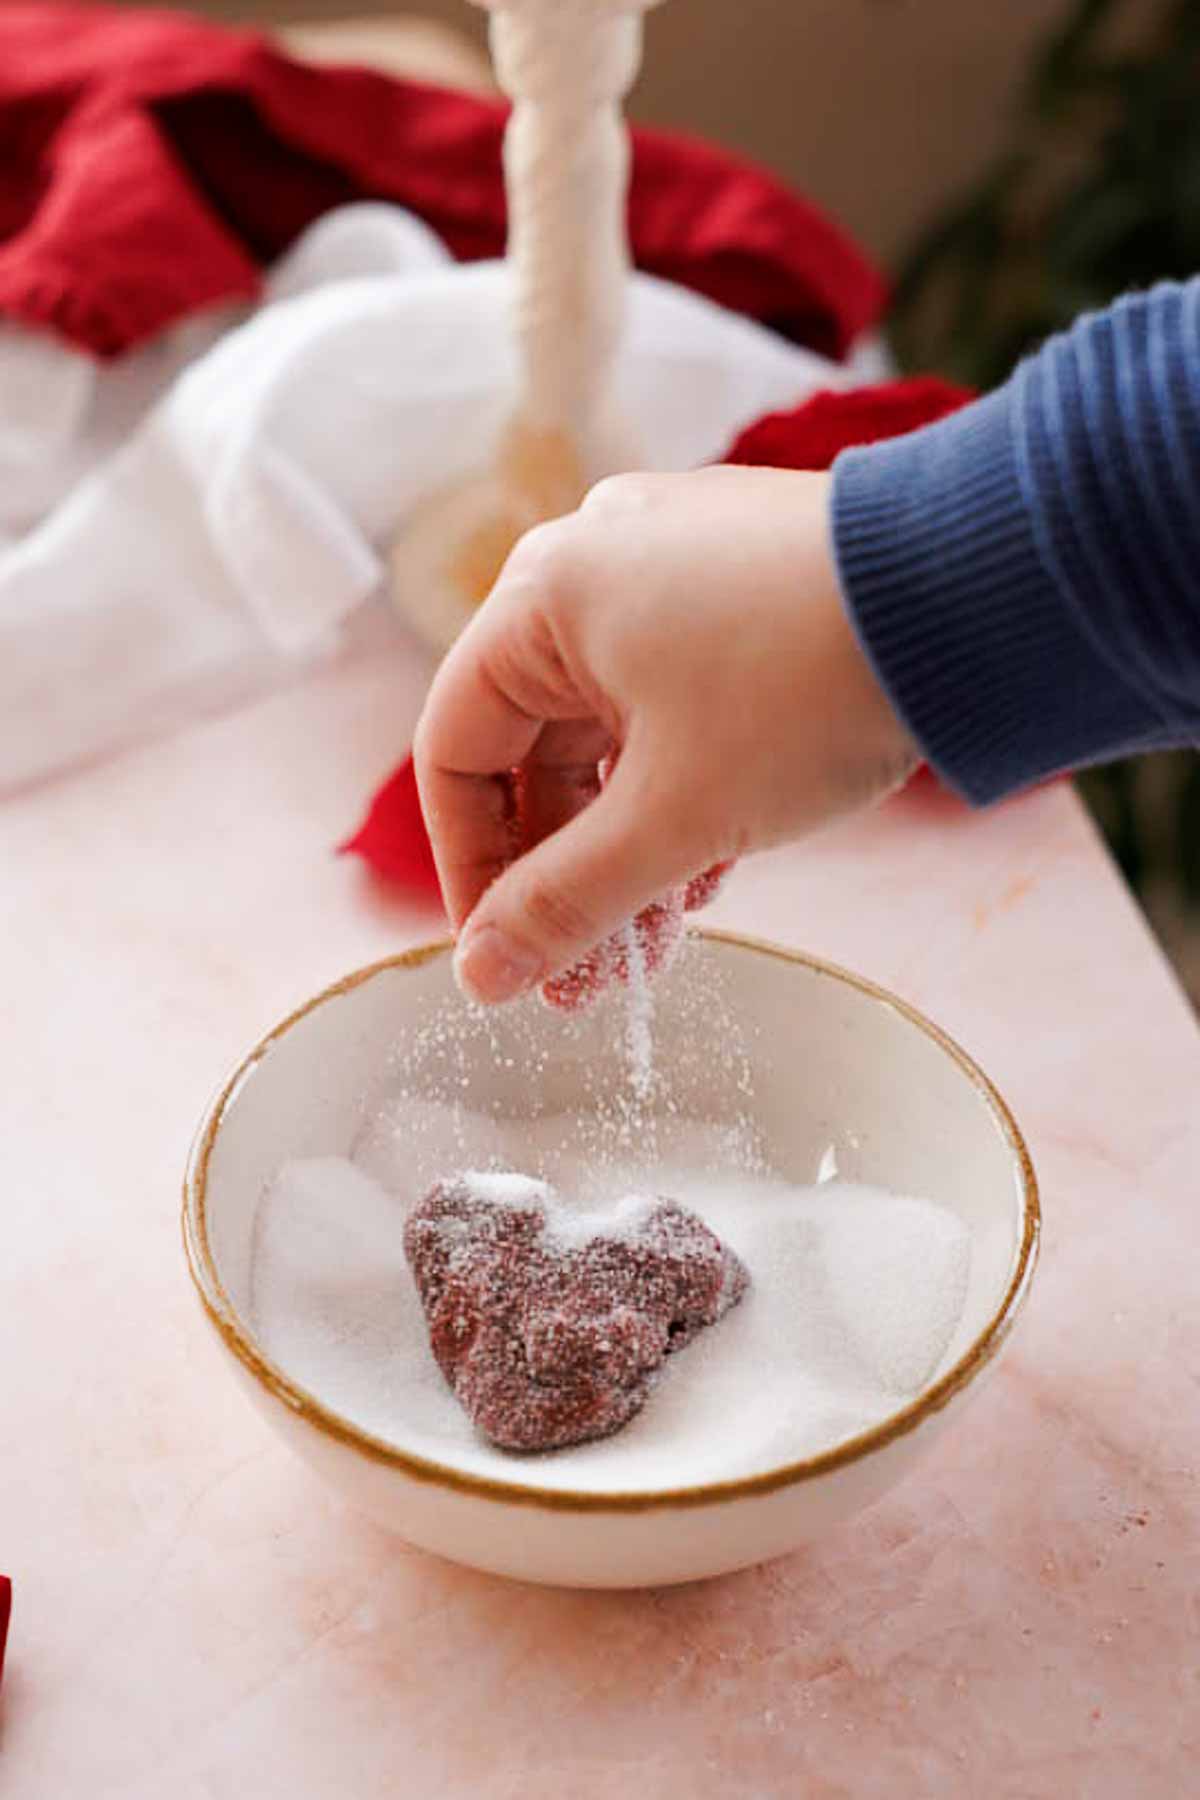
Step 6: Once you fill each cookie dough ball, immediately roll it into sugar so that the sugar sticks.
Expert stuffed cookie tip: Keep the cheesecake filling frozen! It's so much easier to fill the cookie dough with frozen filling. If it defrosts, stuffing the cookie dough will get super messy.
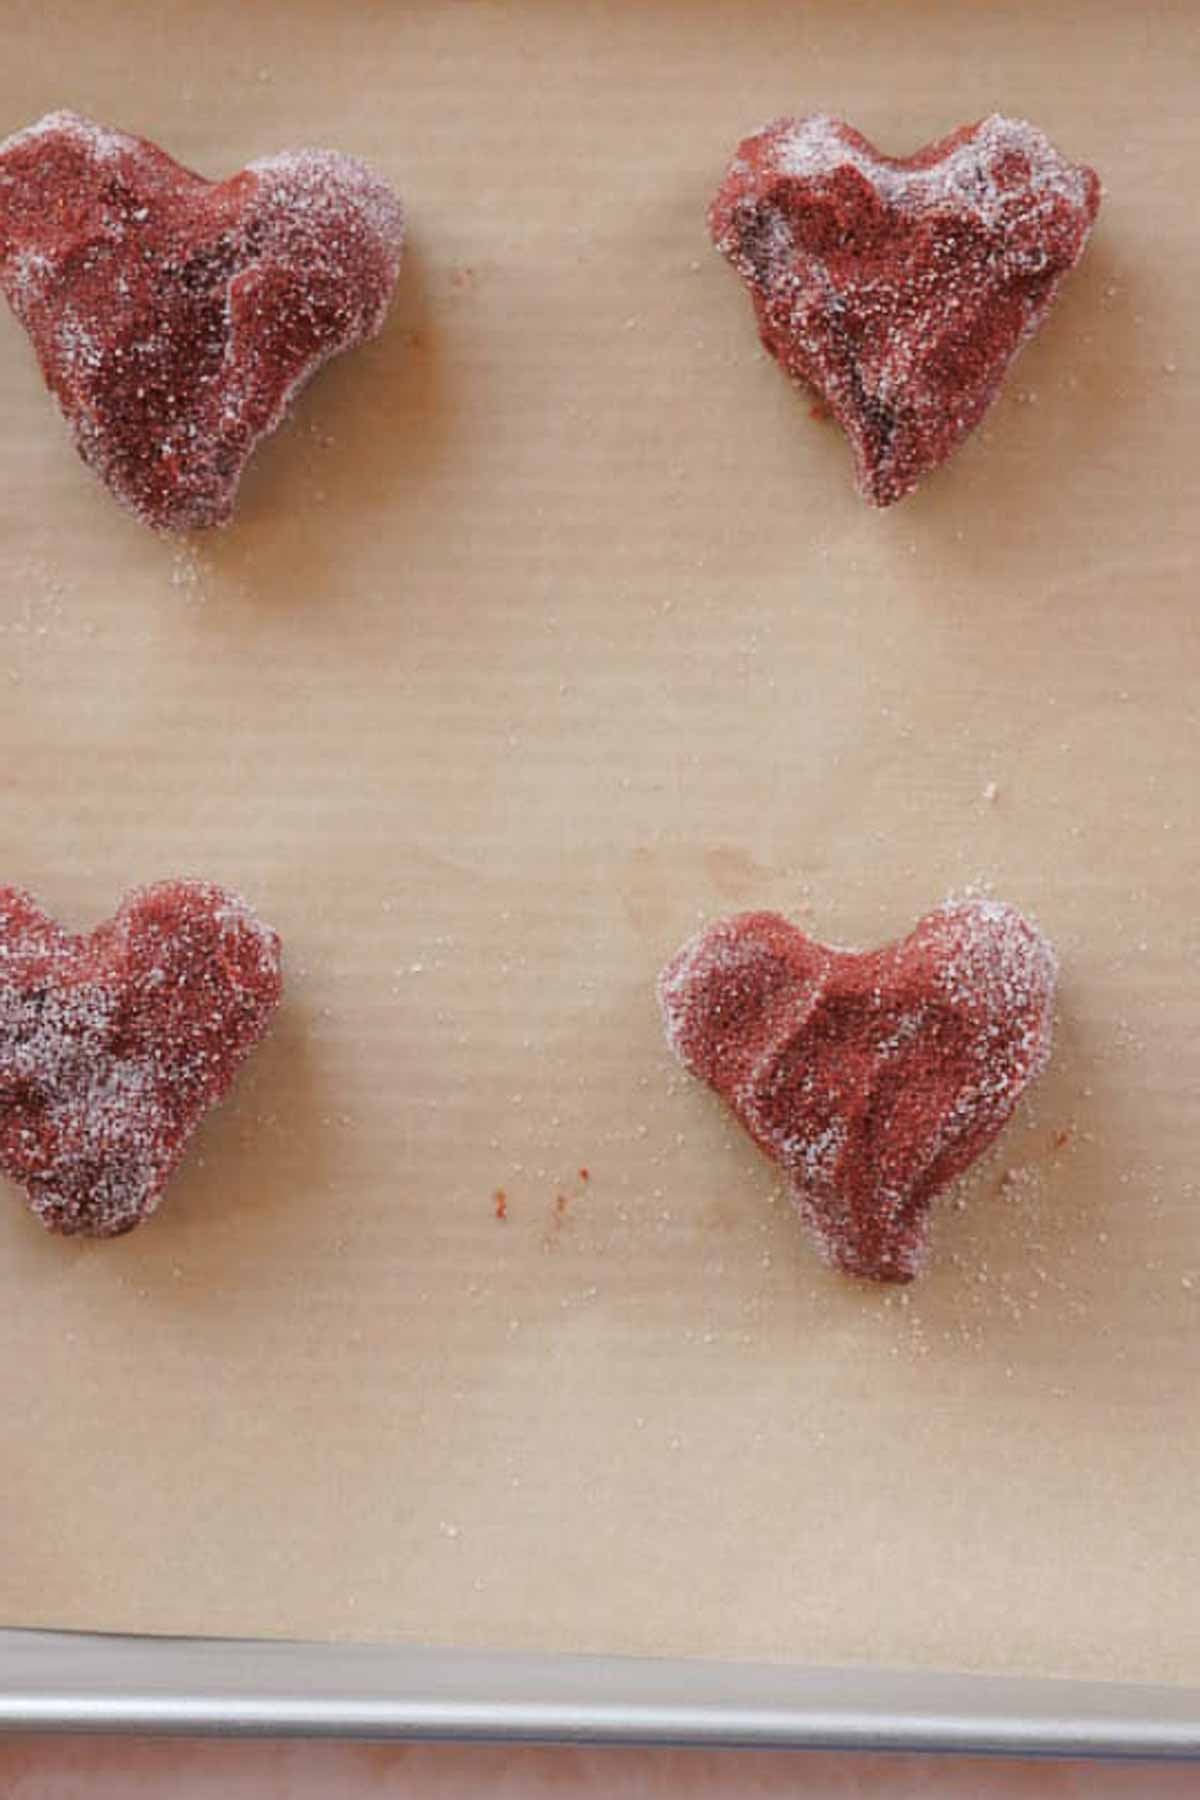
Step 7: Bake the shaped and filled cookie dough for 10 minutes, leaving 2-3 inches of space in between to spread. Remove the cookies from the oven and use a spatula to reshape the indentation and points of the hearts.
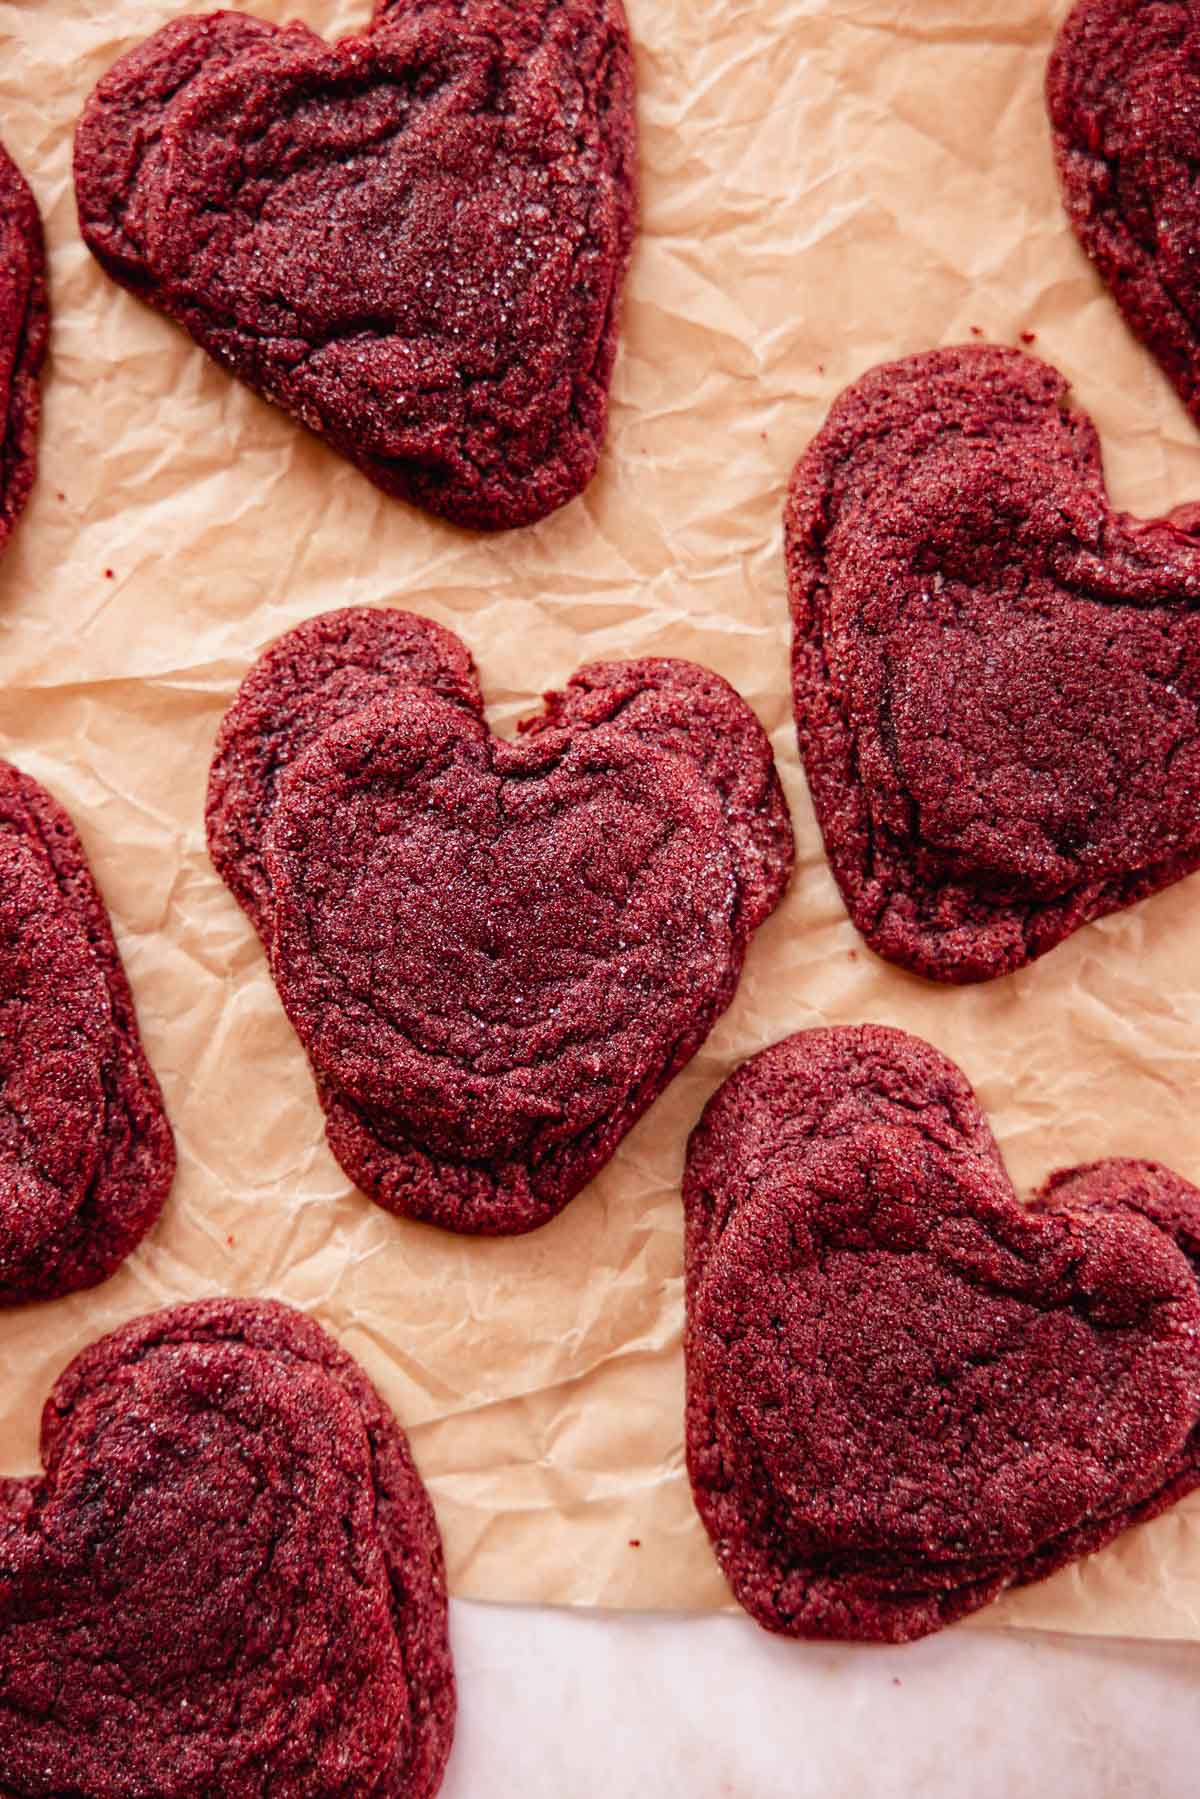
Step 8: Place them back into the oven to bake for another 2-3 minutes, until the top of the cookie just stops appearing wet and shiny. Place the remaining cookie dough in the fridge until you're ready to bake them.
If you're baking these cookies without the cheesecake filling: Pop the rolled and sugared cookie dough balls into the freezer for 20 minutes before baking. Reduce the baking time by 2 minutes.
✔️ Expert cookie tips
- Leave space for spreading when baking: These cookies spread in the oven so make sure that you leave at least 2 inches of space between each cookie when baking.
- Refrigerate the cookie dough that you aren't baking: This keeps the cookie dough chilled and ensures that they bake up perfectly and don't spread too much.
- Slightly underbake the cookies: The best texture is when the cookies are a touch underbaked (not raw!). I found that 13 minutes was perfect, but you may want to keep an eye on the time because it may vary slightly according to your oven.
- Reshape the cookies after 10 minutes of baking: at this point the cookie dough is mostly set but still quite malleable. In order to get a distinct heart shape, you may need to push in the upper indentation of the heart and push the bottom corner together gently with a spatula. Place it back into the oven to finish baking for another few minutes.
🥄 Make ahead and storage
You can certainly make these red velvet cookies ahead of time. The cream cheese filling can be made a few days ahead of time. Store it in the freezer until you're ready to bake the cookies.
You can also freeze the stuffed cookie dough in an airtight bag or container for up to 2 months. Add an extra minute or two of baking time if you're cooking from frozen.
Store the baked cookies in a container in the fridge for up to 4 days. They do need to be refrigerated due to their cheesecake filling.
❔ How do I bake red velvet cookies without filling?
If you're baking these cookies without the cheesecake filling, there are only two changes you need to make. Since the frozen cheesecake filling chills the cookie dough, you'll need to pop the rolled and sugared cookie dough balls into the freezer for about 20 minutes before baking. This is to just set the butter to prevent excessive spreading in the oven.
Since the cookies are also smaller, reduce the baking time by 2 minutes. Keep an eye on them and take them out when they achieve your desired doneness.
📖 Recipe FAQs
Yes I highly recommend freezing the filling. It makes it so much easier to stuff the cream cheese into the cookie dough and is a lot less messy! Don't even try filling the cookies without freezing the filling. I tried and it was a terrible experience.
Yes, substitute the flour with 1:1 gluten free flour and you'll be good to go!
No, you don't need to chill the cookie dough. The frozen cream cheese filling that gets stuffed into the cookie dough actually chills the cookie dough.
❤️ More related red velvet recipes


Did you make this recipe? I would love for you to rate this recipe and hear what you think in the comments below! Share your creation on Instagram and tag @flouringkitchen. Follow me on Pinterest to save and for more recipe ideas.
📖 Recipe
Cream Cheese Stuffed Red Velvet Cookies [Heart Shaped]
Equipment
- large cookie sheet
Ingredients
Cheesecake Filling
- 8 oz cream cheese softened
- ¼ cup granulated sugar
- 1 teaspoon pure vanilla extract or vanilla bean paste
Red Velvet Cookie dough
- 1 cup unsalted butter softened
- ½ cup light brown sugar or golden sugar, packed
- ½ cup granulated sugar
- 1 large egg room temperature
- 1 large egg yolk room temperature
- 1 tablespoon pure vanilla extract
- ½ teaspoon sea salt
- red gel food coloring as needed
- ⅓ cup cocoa powder Dutch processed
- 2 cups all purpose flour 240g
- ¼ teaspoon baking soda
- ½ teaspoon baking powder
- ¼ cup granulated sugar for rolling
Instructions
Cheesecake filling
- *Make this one hour before making the cookie dough so that the filling has a chance to freeze. You can make the cheesecake cookie filling 1-2 days ahead of time and freeze until you're ready to make the cookie dough and bake the cookies.*
- In a medium bowl, combine cream cheese, sugar, and vanilla extract. Mix together until creamy.8 oz cream cheese, ¼ cup granulated sugar, 1 teaspoon pure vanilla extract
- Transfer to a piping bag or a ziploc bag with the end cut off. Pipe 16 heart shaped dollops onto a parchment lined baking sheet or plate. Place the baking sheet into the freezer to freeze.
Red Velvet Cookie Dough
- Preheat the oven to 355°F (180°C). Line a cookie sheet with parchment paper.
- In a stand mixer or large bowl, combine softened butter, granulated sugar, and light brown sugar. Open the teabags and add the contents into the bowl. Mix with an electric mixer until it starts to get light and creamy.1 cup unsalted butter, ½ cup light brown sugar, ½ cup granulated sugar
- Add one egg, egg yolk, vanilla extract, salt, and red food coloring to the butter mixture. Mix until combined.1 large egg, 1 large egg yolk, 1 tablespoon pure vanilla extract, ½ teaspoon sea salt, red gel food coloring
- Sift the cocoa powder into the bowl. Add flour, baking soda, and baking powder into the bowl. Stir together to form a cookie dough.2 cups all purpose flour, ¼ teaspoon baking soda, ½ teaspoon baking powder, ⅓ cup cocoa powder
- Portion the cookie dough into 16 balls. I used a 1.35 oz (2.7 tablespoon scoop) for this.
- Remove the cream cheese from the freezer. One by one, flatten each cookie dough ball and add the cream cheese filling into the center. Press the cookie dough around the filling. Work quickly so that the filling doesn't melt.
- As soon as you fill each cookie dough ball, roll it in sugar immediately so that the sugar sticks.¼ cup granulated sugar
- Bake the shaped and filled cookie dough for 10 minutes on parchment lined baking sheets, leaving 2-3 inches of space in between to spread. Remove the cookies from the oven and use a spatula to reshape the indentation and points of the hearts.
- Place the cookies back into the oven to bake for another 2-3 minutes, until the top of the cookie just stops appearing wet and shiny. Place the remaining cookie dough in the fridge until you're ready to bake them.
- Let the cookies rest on the baking sheet for 1 minute before transferring onto a cooling rack to cool. Finish baking the cookies.
- If you're baking these cookies without the cheesecake filling: Pop the rolled and sugared cookie dough balls into the freezer for 20 minutes before baking. Reduce the baking time by 2 minutes.
Video
Notes
- Leave 2-3" of space for spreading when baking.
- Refrigerate the cookie dough that you aren't baking.
- Slightly underbake the cookies for the perfect (not raw!) chew and soft texture.
- Keep the cheesecake filling frozen for easier stuffing.
- Reshape the cookies after 10 minutes of baking while the cookies are mostly set but still quite malleable for a distinct heart shape. Then, finish baking the cookies in the oven for another few minutes.
Comments
No Comments